Image renditions are not the only actions to perform on your AEM assets. Another essential aspect is asset metadata. Depending on the usage, metadata can drive your brand taxonomy, can help authors find the asset or finally be the driver for your asset brand governance. Thanks to the Asset Compute service being part of AEM as a Cloud service, you can generate custom renditions by extracting important features from your assets using intelligent services.
In my previous post, that was about how to generate intelligent renditions with AEM as a Cloud Service, I showed how to build an Asset Compute worker that generates custom renditions, driven by intelligent services. In this post, I'm going to show how to implement a worker that generates custom metadata. It is a relatively easy task, as the worker implementation is pretty much the same, only the response is different. Instead of the asset binary, it must be XMP data structure serialized into an XML file.
I've previously explained how Asset Compute Service works and the way data flows across the layers. For metadata workers, things are quite similar. The only difference is the outcome of the custom worker, which is an XML file instead of the asset binary. As the XML document contains asset metadata, it has to conform to the XMP specification.
TL;DR
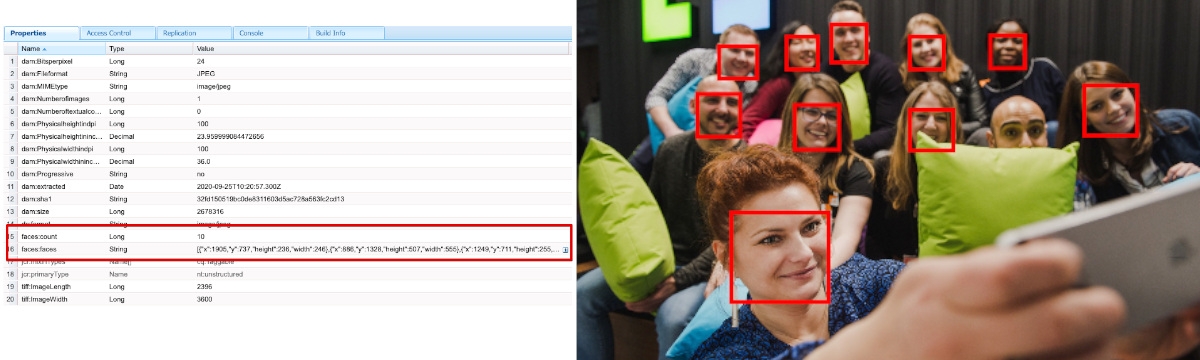
Once again, I used imgIX as my intelligent service. But this time, I used a function that detects faces in the
image. That function is looking for coordinate data for the bounds, mouth, left eye, and right eye of each face and adds
it to the JSON output. Since, we're interested in the face bounds only, other data is going to be ignored. This data is
about to be stored in AEM as new metadata fields: faces:count and faces:bounds. However, instead of just showing
them as yet another field in the AEM metadata editor, I created a custom component to visualise those regions. And here
is the result for a sample asset.

You might be wondering why one of the faces doesn't have a red rectangle. It is because only a fragment of the face is visible, so service was unable to determine its bounds.
What we will build
Conceptually, the data flow is similar to the renditions worker, as you can see in the diagram below.

- On each processing job, our worker first transfers the source image from AEM binaries cloud storage to the Azure blob storage used by imgIX as a source of assets.
- Once it's done, the worker generates a URL to the imgIX. The URL holds the parameters enabling face detection and the desired output format.
- The last thing it does is getting the JSON from the URL, transforming it into XMP object serialized into XML file and finally uploads it back to the AEM cloud storage.
- Once the metadata XML lands in AEM, it is automatically merged with the given Asset metadata and stored in JCR under
jcr:content/metadatanode.
Implement the worker
Before implementing the worker, you'd need to set up all the services. You can do it by following the setup steps from the previous post.
- Then, create a new application using AIO CLI
$> aio app init my-custom-metadata-worker- You will be asked to select your Adobe Organization, followed by the console project selection (pick the one you created by following the guide in my previous post) and, finally, choose a project workspace where you added all the required services.
- Next, you need to pick the components of the app. Select only Actions: Deploy Runtime action.
- On the type of action, choose only: Adobe Asset Compute worker.
- Provide the name of the worker and wait for
npmto finish installing all the dependencies.
Once it's done, edit the .env file and add the following lines. These are the environment variables the AIO CLI uses.
In a production deployment, you can set them directly on your CI/CD pipelines as environment variables.
## A path to the private.key you obtained from Adobe Console
ASSET_COMPUTE_PRIVATE_KEY_FILE_PATH=/path/to/the/private.key

## Azure blob storage container you created to simulate AEM binaries cloud storage
AZURE_STORAGE_ACCOUNT=your-storage-account
AZURE_STORAGE_KEY=your-storage-key
AZURE_STORAGE_CONTAINER_NAME=source

# Azure blob storage container used by the imgIX as assets source
IMGIX_STORAGE_ACCOUNT=your-storage-account
IMGIX_STORAGE_KEY=your-storage-key
IMGIX_STORAGE_CONTAINER_NAME=imgix

# A security token you obtained when setting up imgIX source
IMGIX_SECURE_TOKEN=imgx-token
# A imgix domain you defined when setting up imgIX source
IMGIX_DOMAIN=your-subdomain.imgix.net
Edit the manifest.yml file and add an inputs object, as shown below. This file describes the IO Runtime action to be
deployed. And input param sets the default parameters with values referenced to our environment variables. Those
params are available in IO Runtime action as param object.
packages:
  __APP_PACKAGE__:
    license: Apache-2.0
    actions:
      my-custom-metadata-worker:
        function: actions/my-custom-metadata-worker/index.js
        web: 'yes'
        runtime: 'nodejs:12'
        limits:
          concurrency: 10
        inputs:
          imgixStorageAccount: $IMGIX_STORAGE_ACCOUNT
          imgixStorageKey: $IMGIX_STORAGE_KEY
          imgixStorageContainerName: $IMGIX_STORAGE_CONTAINER_NAME
          imgixSecureToken: $IMGIX_SECURE_TOKEN
          imgixDomain: $IMGIX_DOMAIN
        annotations:
          require-adobe-auth: true
We also need to add a couple of dependencies to our project.
@adobe/aio-lib-files- Adobe's library that simplifies access to the Azure blob storage within the IO Runtime actions@adobe/asset-compute-xmp- Adobe's library that simplifies the creation of XMP metadata object and its serialization to XMLimgix-core-js- imgIX client library used to generate signed URLs to the asset for a given set of processing parameters.axios- HTTP client we will use to make get the JSON from imgIX
$> npm install @adobe/aio-lib-files @adobe/asset-compute-xmp imgix-core-js axiosEdit the worker source code (located under my-custom-metada-worker/actions/<worker-name>/index.js) and replace it with
the following code.
const { worker } = require('@adobe/asset-compute-sdk');
const { serializeXmp } = require('@adobe/asset-compute-xmp');
const filesLib = require('@adobe/aio-lib-files');
const fs = require('fs').promises;
const axios = require('axios');
const ImgixClient = require('imgix-core-js');

/**
 * Function that extracts faces boundries from the imgIX response
 */
function parseFaces(data) {
  const result = [];

  if (data.hasOwnProperty('Faces')) {
    var faces = data.Faces.map(face => ({
      x: Math.round(face.bounds.x),
      y: Math.round(face.bounds.y),
      height: Math.round(face.bounds.height),
      width: Math.round(face.bounds.width),
    }));
    result.push(...faces);
  }

  return result;
}

async function detectFaces(params, sourcePath) {
  try {
    // Generate file path for the uploaded file (we will use same as source)
    const targetPath = sourcePath;
    // Initialize AIO Storage lib to use Azure blob storage
    // The storage is mounted by the IMGIX service, so any
    // source image must be uploaded there for precessing
    const targetStorage = await filesLib.init({
      azure: {
        storageAccount: params.imgixStorageAccount,
        storageAccessKey: params.imgixStorageKey,
        containerName: params.imgixStorageContainerName,
      },
    });

    // Copy uploaded source file into the imgix blob storage
    // localSrc:true means that first path provided is from
    // the local file system (sdk does the magic and
    // in fact it's an AEMasCloud blob storage)
    await targetStorage.copy(sourcePath, targetPath, { localSrc: true });

    //Intiialize imgIX link builder with the secure token
    const client = new ImgixClient({
      domain: params.imgixDomain,
      secureURLToken: params.imgixSecureToken,
    });
    //Generate link to the rendition
    // faces:1 - tells to recognize faces on the image
    // fm: json - tell to get the result as JSON with faces coordinates
    const response = await axios.get(client.buildURL(targetPath, { faces: 1, fm: 'json' }));

    //Parse the service response into the object containing only faces boundries
    const faces = parseFaces(response.data);

    //Return a metadata XML as a serialized XMP object that consists of:
    // Count of faces recognized
    // Faces boundries data as serialized JSON object
    return serializeXmp(
      {
        'faces:count': faces.length,
        'faces:faces': JSON.stringify(faces),
      },
      {
        namespaces: {
          faces: 'https://cognifide.com/schema/faces',
        },
      }
    );
  } catch (error) {
    console.error(error);
    return '';
  }
}

exports.main = worker(async (source, rendition, params) => {
  // Throw an error is file is broken or empty
  const stats = await fs.stat(source.path);
  if (stats.size === 0) {
    throw new SourceCorruptError('source file is empty');
  }
  //Detect faces on the image
  const facesXmp = await detectFaces(params, source.path);

  // save the XMP metadata to disk - so it will be returned by the
  // worker back to AEM
  await fs.writeFile(rendition.path, facesXmp, 'utf-8');
});
Most of the code in the detectFaces function is the same as for rendition generation. Notable differences are:
- At line 56, we're calling the imgIX with parameters (
{ faces: 1, fm: 'json' }) that tells the service to generate JSON with detected face boundaries. - At line 59, we're extracting the information we need (faces boundaries)
- At lines 64-71, we're building XMP object with our custom namespace faces and serialize it into the XML
- Finally, at line 89 we're writing out the XML to the rendition output location that is then written out to the AEM cloud storage by the Asset compute framework.
Run worker locally
Just run the following command.
$> aio app runAfter a couple of seconds, it will open Asset Compute Devtool in your browser. Within that tool, you can test your worker without the AEM.

Our metadata worker doesn't require any extra parameters. However, the rendition parameter should have XML extension,
so the framework knows what type of response to generate. Run your worker and see the XML is generated on the right-hand
side of the Asset Compute Devtool. If you open it, you can see a result similar to this.
<?xml version="1.0" encoding="UTF-8"?>
<rdf:RDF xmlns:faces="https://cognifide.com/schema/faces" xmlns:rdf="http://www.w3.org/1999/02/22-rdf-syntax-ns#">
<rdf:Description>
<faces:count>2</faces:count>
<faces:faces>[{"x":405,"y":70,"height":92,"width":108},{"x":503,"y":122,"height":88,"width":88}]</faces:faces>
</rdf:Description>
</rdf:RDF>To let AEM use our worker, deploy the app by running the command.
$> aio app deployAs a result of that command, you will get the URL of your worker, similar to the below. Write down that URL as we need to put it in AEM configuration.
Your deployed actions:
  -> MyAssetCompute-0.0.1/__secured_my-metadata-worker
  -> https://99999-myassetcompute-dev.adobeioruntime.net/api/v1/web/MyAssetCompute-0.0.1/my-metadata-worker
Well done, your app is now online 🏄
AEM
As I mentioned at the beginning of the article, we will use a custom component on the metadata editor to visualize our
faces metadata. I created a simple AEM application with the mentioned component and all it is available at my Github
repository.
You can merge it with your application codebase or simply deploy as it is to your cloud instance. Once you deployed it, you need to configure AEM to use our custom worker.
- Go to your AEM cloud instance and open Tools -> Assets -> Processing Profiles
- Create a new processing profile, e.g.
My Worker test profile - Go to the Custom tab and configure your renditions using your worker, as shown below.

As the last step, you need to apply the profile to DAM folder.

Now you can upload images to the folder and see the result on the asset metadata editor page. Additionally, you can inspect the metadata node via CRXDE to see how AEM merges it.

Summary
As you saw in this and previous article, the Asset Compute workers are relatively simple things. However, if you integrate it with any asset processing intelligent services, they open a door to build a completely new category of solutions. Thanks to the custom metadata workers, you can now start thinking about use cases touching subjects like brand governance.
Brand governance workflows for assets such as:
- Detect colours used by the Asset and if they are compliant with your brand guidelines
- Extract text from the images to get the Asset searchable by that text
- Classify assets using custom vision services, e.g. see how we're doing it with Azure Custom Vision services.
- Detect the presence and/or correctness of the objects (e.g., such as brand logos)
- And many, many more ...
All of this seems to be easy to accomplish. However, there are some serious challenges to solve when it comes to the development process. If you develop your workers, you want to test it locally together with AEM implementation - a good example is my custom component for metadata editor. At the moment, it's a cumbersome process as it requires deployment on the AEM as a Cloud service instance first, or manually simulate (change in the CRX) the result of the worker processing.
Asset Compute service support is not enabled on the local AEM-SDK, so you need to figure out other ways of doing it. I was experimenting with two approaches that might be helpful in a short-term:
- Implement a tool (e.g. in NodeJS) that downloads an original asset from your local AEM instance, uploads it to the Asset Compute Dev tool and triggers processing. Processing results are then uploaded back to your local AEM instance via AEM API.
- Or, implement an AEM Workflow step that communicates with the Asset Compute Devtool and does the same.
The ideal solution would be to get a similar feature available in AEM-SDK, either by enabling Asset Compute integration but with the possibility to plug it into the Asset Compute Devtool, or some form of the AEM Workflow step communicating with the Asset Compute Devtool. Any solution would make a developer experience more seamless.
